
Like many of you I have a networking background with some basic programming skills, mostly from my time in uni. With all the buzz around cloud, DevOps and automation and self-servicing IT it doesn’t hurt to know a bit more about how to bridge the gap between networking and programming. A big component of automating tasks is by leveraging various APIs in order to optimise processes and workflows.
Many people I talk to have a similar background as me so I thought it might be handy to share on how to interact with a REST API, followed by using this knowledge to build a simple web app that automates a simple yet repetitive task. In this article I’m assuming you know the absolute basics of what a REST API is and why it’s useful, if in doubt then this is a great article to refresh your memory. In a simplified way you can think of a RESTful API as just a client/server model, with the VDX being the server and your computer being the client.
Many of Brocade’s devices support RESTful APIs (aka REST APIs) in order to execute tasks by using standard HTTP requests. The best example is the Brocade SDN Controller, which is built around APIs to allow for optimal integration into a heterogenous network infrastructure with both northbound and southbound APIs. For this blog post I’ll focus on interacting with just two VDXs, in order not to overcomplicate things.
I’ve built a simple webpage that will create a VXLAN overlay tunnel between two sites, based on the VLANs + VXLAN Network Identifier (VNI) specified in the app. Fairly simple use case, but it saves me configuring these repetitive yet error-prone tasks in CLI.
First things first: accessing the REST API. The best way to do this is using a REST client, with my personal favourite being Postman for Chrome or Paw for Mac OSX. Go ahead and install the one you prefer.
I’m using Postman, and first thing I normally do is fill in the correct username/password for the switch under Basic Auth, so we can talk to a device.
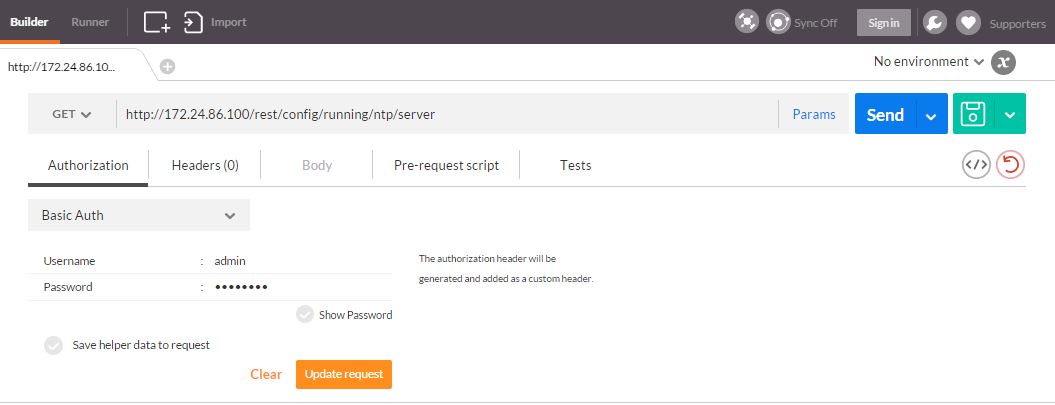
“Great, now what?” I hear you think. We still don’t know what to request from the switch, or more importantly: how to ask what we need. For that, we need to look at the REST API Guide which contains all the information we need to make the right calls and get the information we want.
As a brief example, if we want to get the NTP server that is configured on a particular VDX, we need to use the following GET request according to the API guide:
We’re using a GET operation to read the configuration which is great to start with, as it doesn’t need any parameters. To make changes we could also use POST to submit configuration, DELETE to delete configuration or PUT to update configuration and those would often need an additional payload to specify the changes you want to make.
Once you execute (click on “Send”) you’ll see something like this, obviously only if you have configured an NTP server:

The data we’re getting back is XML, and it’s telling us there’s an NTP server configured with IP 172.24.86.240. Well done, you’ve just used the REST API to interact with a VDX switch! Obviously using Postman isn’t very scalable: every command requires you to know the syntax and send it to the switch - we’re not automating anything. However, what Postman is useful for is for quickly checking the syntax for a certain action or for troubleshooting.
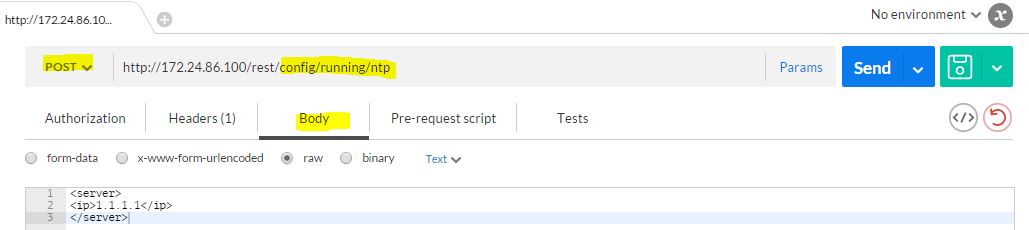
Imagine you want to add an NTP server? We would need to use a POST operation to add this to the switch. Check the API guide again for the right syntax, in this case we’ll just follow the API guide example to add an additional NTP server with IP 1.1.1.1.
POST:
Body:
Which looks like this:
You’ll see Status 201 Created in Postman, which means it worked. Any status code higher than 400 is normally not a good sign, and depending on the exact message could mean the syntax is incorrect, the credentials are incorrect or the specified operation is not allowed.
If we now run the initial GET request again, there are two NTP servers configured:

To delete the 1.1.1.1 NTP server, you can do a DELETE operation with an empty body:
That should give you some ammo to start working with the API. Now let’s do something a touch more interesting, which is mapping and extending a L2 domain over L3 using VXLAN. Make sure you have a working overlay-gateway in place already, look at my previous post to do this. What we’ll do with the REST API is the following:
- Map a local VLAN to a unique VXLAN Network Identifier (VNI).
- Setup the site configuration to extend that configured VLAN.
Using the REST API, this will take 4 calls to achieve this for 2 sites - the above two actions per site.
Page 260 in the REST API Guide shows the calls we can use. We can retrieve the current overlays with a GET operation:
Substitute VDX_IP for the right IP address of the VDX, and SITE_ID with the name you gave the site in the overlay-gateway configuration.
Let’s create a new tunnel, with VLAN 10 on 172.24.86.100 connecting to VLAN 10 on 172.24.87.200 over VNI 5010. The sites are called POD1 and POD2.
PUT operation:
To map a local VLAN to a VXLAN VNI, use the following:
To extend the VLAN between sites:
Well done, you’ve now configured a VXLAN overlay between two sites, this time through the REST API! Still not automated requiring a few different calls through Postman. Let’s create a simple web app to alter the configuration in a more user-friendly way. To keep it small and to the point I’ve statically defined our two sites and their VLANs. It’s obviously possible to use the REST API to get these dynamically - go crazy if you want to!
Big thanks to my colleagues Darin Sikanic and Jon Castro for pointing me to Bootstrap and helping me out with this, would’ve taken me some time to figure all this out myself.
The homebrew app looks like this:
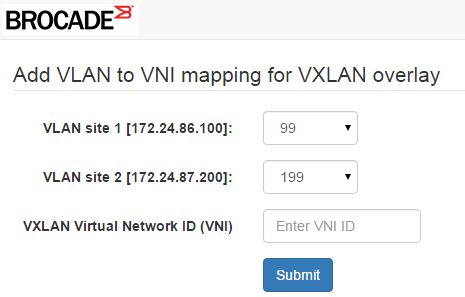
While it may look daunting at first if you’re not familiar with JS or jQuery, it’s fairly straightforward what we’re doing here. This is what the code does: once the user clicks on submit, we set a few variables to get the VLAN IDs per site and for the VNI ID based on the user’s input.
We then use a few functions in order to make things happen:
mappingPayload uses the specified VLAN ID and VNI to set the VLAN -> VNI mapping.
extendPayload uses the specified VLAN ID to extend the VLAN in the site configuration.
doAjax is used for the actual calls to the switch.
Few things to note for the doAjax() function:
-
We set an Authorization header with a hash, the one used is for “admin/password”. You can use the username/password as well, or get the hashed version through Postman.
-
uri: the HTTP URL we want to use for our API operation. You can specify the VDX directly, but you might run into a Access-Control-Allow-Origin error. In that case you’d have to use a proxy, you can use corsa and run it like this for testing: corsa –allow-proxy ALL –allow-origin ALL -
Type:PUT, to update configuration. -
Accept: the VDX expects this to beapplication/vnd.configuration.resource+xml, as specified in the REST API guide. -
contentType:application/xml, as specified in the REST API guide.
If all went well, we should be able to get some feedback once we implement this - let’s check. We’ll use the Chrome built-in browser Dev Tools (F12 on Windows machines) to see what the output is after we go to our app and submit the form once filled in with VLANs and the VNI:

Like a wise man once said: “Great success!”.
If you would like to see how to do something similar using Python, my colleague Jeff Rametta wrote a great blog post about that.